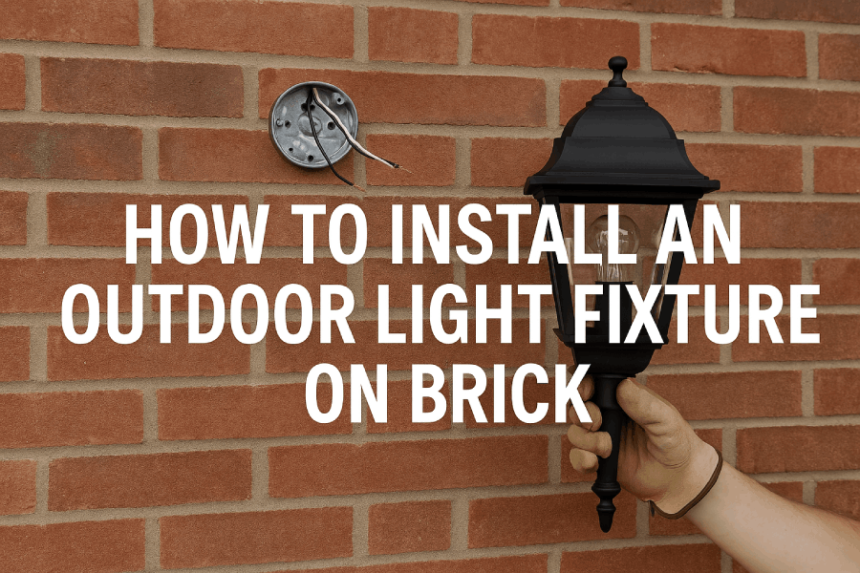
Outdoor lighting adds instant value to your home—whether it’s for safety, security, or curb appeal. But when your exterior wall is made of brick, even a simple job like mounting a new fixture can feel a bit overwhelming.
In addition to improving visibility and comfort, today’s energy-efficient outdoor lighting can help you cut down on your electricity bill. Learn how energy efficiency protects the planet and your wallet.
Brick is tough and uneven, which makes drilling tricky. And if you’re not careful, you could damage your wall or end up with a fixture that doesn’t sit flush or stay weatherproof.
The good news? You can install an outdoor light fixture on brick without a hassle—no matter your skill level. Whether you’re replacing an old lantern-style light, adding a security fixture, or decorating with temporary lights, this guide has you covered.
Here’s what we’ll cover:
- How to hardwire and mount an outdoor light on a brick wall (step-by-step)
- Surface-mount options like pancake boxes to avoid chiseling
- Non-invasive alternatives like hot glue or brick clips for temporary lights
- Tools, safety tips, and real-life advice from experienced DIYers
If you’ve been wondering how to attach outdoor lights to brick walls—with or without drilling—you’re in the right place. Let’s get started.
Tools and Materials You’ll Need
Before installing an outdoor light fixture on a brick surface, it’s important to gather the right tools and materials. Your supply list will vary slightly depending on whether you’re installing a permanent hardwired fixture or a temporary decorative light setup.
This section breaks down what you’ll need for each type of project.
For Hardwired Outdoor Light Fixtures on Brick
This is the most common method for installing wall-mounted lights such as porch lights, garage fixtures, or security lighting.
Tools:
- Hammer drill or rotary drill with variable speed
- Masonry drill bit (carbide-tipped)
- Screwdriver (flat-head or Phillips)
- Wire stripper and cutter
- Voltage tester (for safety)
- Level (to ensure the fixture is straight)
Materials:
- Outdoor-rated light fixture (lantern, floodlight, or sconce)
- Electrical junction box (preferably a surface-mounted pancake box)
- Tapcon screws or masonry anchors
- Weatherproof silicone caulk or sealant
- Twist-on wire connectors (wire nuts)
- Fixture mounting plate or bracket (usually included with the light)
- 14/2 or 14/3 NM-B electrical wire (if adding or extending power)
- Optional: weatherproof gasket for added moisture protection
Tip:
If your existing box is not flush with the brick wall, a surface-mounted pancake box is a great low-profile solution. Many homeowners prefer this method because it avoids chiseling into the brick and hides neatly behind most fixtures.
For Temporary or Decorative Lights on Brick
This method is ideal for hanging seasonal lighting such as holiday lights or decorative string lights.
Tools:
- Hot glue gun (rated for outdoor use)
- Wire cutter or scissors
- Extension cord and outlet timer (optional)
Materials:
- C9 socket light line (9-inch spacing is ideal for smaller spaces)
- LED C9 bulbs (long-lasting and energy-efficient)
- Male and female vampire plugs (to customize cord length)
- Zip cord (SPT-1 or SPT-2 rated)
- Outdoor-rated hot glue sticks
Note:
Hot glue works well on brick surfaces and holds up in both warm and cold weather. For best results, apply glue to the base or side of each socket, press it to the brick, hold for a few seconds, then move to the next.
Optional Items
- Brick clips or outdoor adhesive hooks (for lightweight lighting)
- Safety goggles and work gloves
- Portable work light or headlamp (for low-light conditions)
Preparing your tools and materials before starting the project helps avoid delays and ensures a safe and efficient installation. Whether you’re doing a full electrical setup or hanging decorative lights, the right gear makes all the difference.
Want to Shop This List Online?
Shop the Essentials:
- Masonry Drill Bit Set – Amazon
- Outdoor LED Wall Light – Home Depot
- Surface Mount Pancake Box – Lowe’s
- Hot Glue Gun Kit – Amazon
How to Install a Hardwired Outdoor Light Fixture on Brick
Installing a light fixture on a brick wall might feel intimidating at first, but with the right steps, you can do it yourself. This guide walks you through a safe, permanent installation using standard tools and a few simple techniques.

Step 1: Turn Off the Power
Before starting any work, turn off the power to the light fixture at your home’s electrical panel. Use a voltage tester to make sure the power is off. This is a critical safety step—never skip it.
Step 2: Check the Electrical Box
Look for an existing electrical box where the new light will go.
- If there’s already a box in place and it’s in good shape, you can use it.
- If there’s no box, or the current one is set too far back, you’ll need to install a surface-mounted pancake box.
To install a pancake box:
- Mark the spot on the brick.
- Drill pilot holes using a masonry drill bit.
- Secure the box with masonry screws or anchors.
- If needed, drill a hole through the brick to run your electrical wire.
Tip: A pancake box is shallow and works well on brick walls without cutting into them.
Step 3: Prepare the Wires
Pull the wires through the electrical box. Use a wire stripper to remove about ¾ inch of insulation from each wire. You should see:
- A black wire (hot)
- A white wire (neutral)
- A bare copper or green wire (ground)
Step 4: Attach the Mounting Bracket
Most outdoor fixtures come with a metal mounting bracket or plate. Line it up with the electrical box and secure it using the included screws. Use a level to make sure it’s straight.
Step 5: Connect the Wires
Match and connect the wires from your wall to the wires on your new light:
- Black to black (hot)
- White to white (neutral)
- Ground to ground (bare copper or green)
Twist each pair together and secure with wire connectors (also called wire nuts). Carefully tuck the wires back into the box.
Step 6: Install the Light Fixture
Line up the fixture base with the bracket and attach it using the provided screws. Don’t overtighten—just make sure the fixture sits flat against the brick wall.
Step 7: Seal Around the Fixture
To keep water out, apply a line of exterior-grade silicone caulk around the edges of the fixture. Seal the top and sides. Leave a small gap at the bottom so moisture can drain out if needed.
Step 8: Turn the Power Back On
Return to your electrical panel and switch the power back on. Test your new light to make sure everything works.

Optional: Add a Timer or Smart Switch
If you want your outdoor light to turn on automatically at night, consider adding a timer or smart switch. These are easy to install and help you save energy.
In the next section, we’ll show you how to hang lights on brick without drilling—great for decorations or rentals.
How to Hang Outdoor Lights on Brick Without Drilling

You don’t always need to drill into brick to hang lights. If you’re decorating for the holidays or just want a temporary setup, there are several ways to hang lights on a brick wall without using any tools.
This section explains the best no-drill methods. These are perfect for renters, seasonal decorating, or anyone who wants to avoid making permanent changes to their home.
Method 1: Use Hot Glue
Hot glue is a simple and strong way to attach light sockets or string lights to brick. It works well in both hot and cold weather.
How to do it:
- Plug in your hot glue gun and insert a heavy-duty glue stick.
- Apply a small amount of glue to the base or side of the light socket.
- Press it against the brick for about 5 to 10 seconds.
- Let go and move to the next socket.
Good to know:
- Works best on rough or textured brick.
- To remove, gently twist the socket and peel off the glue.
- Don’t use hot glue on stucco with foam underneath—it can melt the foam.
This method is shown in this helpful video: Watch on YouTube
Method 2: Use Brick Clips
Brick clips are metal holders that snap onto individual bricks. They don’t require tools or glue.
How they work:
- You place the clip over the top and bottom edges of a brick.
- It holds in place with pressure.
- You can hang light cords or decorations from the built-in hook.
Pros:
- No tools or glue needed.
- Easy to install and remove.
Cons:
- Only work if your bricks stick out at least 1/8 inch.
- Not strong enough for heavy light fixtures.
Method 3: Use Outdoor Command Hooks
Command hooks are a good choice for smooth or sealed brick surfaces. Look for the type made for outdoor use.
How to use:
- Clean the area with rubbing alcohol and let it dry.
- Peel the backing off the adhesive strip.
- Press the hook firmly against the brick.
- Wait at least an hour before hanging anything.
Tip: These hooks work best for lightweight string lights and decorations. They may not stick to rough, unsealed brick.
Method 4: Use Adhesive Cable Clips
Cable clips are small plastic holders with adhesive backing. They help you run light cords neatly along edges and corners.
Best for:
- Outlining windows or doors.
- Keeping light cords straight and secure.
To install:
- Peel off the backing.
- Press the clip onto a clean, dry surface.
- Snap the cord into the clip.
Method 5: Caulk Gun Hook Hangers
This is a lesser-known method but useful for certain temporary setups. These plastic or metal hangers are designed to be applied using a standard caulk gun filled with construction adhesive (not actual caulk).
How it works:
- Apply a small amount of construction adhesive to the back of the hanger.
- Press it firmly onto the brick wall.
- Let it dry for 24 hours before hanging anything from it.
Pros:
- Semi-permanent and strong
- Good for areas with no protruding bricks
Cons:
- Requires clean-up after removal
- Not suitable for heavy-duty fixtures
Which Option Should You Choose?
| If you want to… | Try this method |
| Hang string lights on rough brick | Hot glue |
| Avoid tools or glue for a temporary setup | Brick clips |
| Stick lights to smooth, painted, or sealed brick | Outdoor Command hooks |
| Keep cords organized and out of the way | Adhesive cable clips |
Expert Troubleshooting Tips
Even with the right tools and instructions, you might run into small issues. Here are solutions to common problems DIYers face when installing outdoor light fixtures on brick walls.
Problem 1: I can’t find a junction box that fits behind my fixture.
Solution:
Look for a pancake box at an electrical supply store or specialty lighting shop. These are very shallow, surface-mounted boxes designed for tight spaces and work well on brick walls.
Problem 2: My fixture’s base doesn’t fully cover the box or mounting plate.
Solution:
It’s usually best to buy the electrical box first, then choose a fixture that can fully cover it. Look for light fixtures with a wide canopy (the part that sits against the wall).
Problem 3: I want a fixture that includes a built-in box to avoid mounting a separate one.
Solution:
There are a few “all-in-one” outdoor lights with integrated boxes, but they’re not very common. Try checking at specialty lighting stores or online retailers. Always confirm that the unit is weather-rated and up to code.
Bonus Tip: Need help drilling into tough brick?
- Use a hammer drill with a carbide-tipped masonry bit.
- Start with a smaller pilot hole before going to your full anchor size.
- If your bit starts to dull, replace it—brick will wear it down quickly.
Real Customer Example – Installing a Light on Brick Without Chiseling
Sometimes the best tips come from people who’ve done the project themselves. Here’s a real-world example from a DIY homeowner who shared their experience on a home improvement forum.
Project Goal:
Install a standard outdoor lantern light on a brick wall without chiseling or cutting into the brick.
Brunno’s Solution (DIY Forum Member)
Brunno had the same problem many homeowners face:
He needed to install a surface-mounted outdoor light on brick, but didn’t want to damage the wall or carve out space for a recessed junction box.
Here’s how he did it:
- Bought a pancake electrical box
- These are thin, surface-mounted junction boxes.
- He found one at Home Depot.
- Mounted the box directly onto the brick wall
- Used Tapcon masonry screws to secure the pancake box.
- No need to chisel into the brick—just drill pilot holes and screw it in.
- Drilled a small hole through the brick
- This allowed him to run 14-3 wire through the wall to power the fixture.
- Made the wire connections and sealed everything
- Connected the wires (black, white, and ground) inside the box.
- Mounted the fixture over the pancake box and sealed around the edges with silicone caulk.
Final Result:
- The fixture was flush-mounted, secure, and weatherproof.
- No bricks were damaged or removed.
- The pancake box was completely hidden behind the fixture’s base.
Brunno’s Tip:
“Buy the pancake box first, then find a fixture that will fully cover it. I did it the other way around and got lucky—my fixture’s base was wide enough.”
Takeaway: You don’t have to chisel into brick to install a light fixture. With a shallow box and the right screws, you can mount your light safely and cleanly on the surface—just like Brunno.
In the next section, we’ll answer common questions like how to seal fixtures, how to use a junction box, and more.
Frequently Asked Questions
These questions go a little deeper and help you handle more advanced or situation-specific parts of installing outdoor light fixtures on brick.
How do I install an outdoor light fixture on a brick wall without drilling?
You can skip drilling entirely if you’re installing temporary lights or lightweight decorative fixtures. Use:
- Hot glue (for string lights or C9 socket lines)
- Brick clips (for hanging lights along brick edges)
- Outdoor adhesive hooks (for smooth brick or mortar lines)
For permanent fixtures (like porch lights), drilling is usually required to secure the junction box.
Can I replace an outdoor light fixture on brick without damaging the wall?
Yes—if your existing fixture is already mounted to a secure box, you can:
- Remove the old fixture carefully.
- Check the electrical box and mounting plate.
- Reuse the existing screw holes and wiring.
- Mount the new fixture and apply fresh caulk for sealing.
This avoids the need for new holes or structural changes.
How do I install a junction box for an exterior light fixture on brick?
Here’s a simplified process:
- Choose a surface-mounted pancake box or weatherproof box.
- Mark the location on the wall.
- Drill pilot holes using a masonry bit.
- Use Tapcon screws or masonry anchors to mount the box.
- If needed, drill a hole through the brick to run electrical wire into the box.
- Seal all edges with silicone caulk for weather protection.
What is the best outdoor light mounting plate for brick walls?
Look for a universal crossbar or a round mounting plate that matches your fixture’s screw layout. It should:
- Be compatible with your junction box.
- Provide a flat, stable surface against the uneven brick.
- Include weatherproof gaskets or seals if possible.
Many outdoor lights come with a mounting kit, but replacements are easy to find at hardware stores.
How do I wire an outside light to an indoor switch?
This is a common upgrade and can be done with basic electrical tools:
- Turn off power at the breaker.
- Run 14/2 or 14/3 electrical wire from the indoor switch to the outdoor box.
- Connect the wires:
- Black to black (hot)
- White to white (neutral)
- Ground to ground
- Use wire nuts and secure all connections inside a junction box.
- Seal everything for weather resistance and test the switch.
Note: Check local codes. If unsure, contact a licensed electrician.
How do I hang Christmas lights on brick without using nails or screws?
You can use any of these non-damaging options:
- Hot glue for C9 sockets or small clips.
- Brick clips for lights along the top/bottom of bricks.
- Outdoor adhesive clips or hooks.
- Caulk gun hook hangers (with construction adhesive).
All are removable and won’t damage the brick if used correctly.
How do outdoor lights help with home security?
Outdoor lights—especially motion-activated ones—are a simple and effective way to deter unwanted visitors. They eliminate dark corners, light up entry points, and give the appearance that someone is home. For a deeper dive into protecting your home from potential risks, check out this guide on risk management strategies for home safety.
Conclusion: Light Up Your Brick Wall with Confidence
Installing an outdoor light fixture on brick may seem like a tough job, but with the right tools, guidance, and a little patience, it’s totally achievable—even for first-time DIYers.
Whether you’re doing a full hardwired install or just hanging string lights for the holidays, there’s a method that fits your home, your tools, and your comfort level.
Here’s a quick recap of what we covered:
- Permanent installation using a surface-mounted junction box and masonry screws
- Hot glue and non-drill options like brick clips and adhesive hooks for temporary lights
- Real-world tips from DIY homeowners who’ve done it successfully
- Expert answers to common questions about safety, sealing, wiring, and product choices
The key is to choose the method that works best for your project. For a permanent light near your entryway, go with a proper junction box and weather-sealed fixture. For decorative lights, lean on hot glue or clip systems that won’t damage your brick.
Above all, take your time, follow safety steps, and don’t hesitate to reach out to a pro if you’re unsure about the wiring.
Need More Help?
- Download our PDF checklist of tools and materials
- Follow along with the step-by-step images and wiring diagram
- Check out the video walkthrough for hot glue light installs
- Drop your questions in the comments—we’re happy to help
With a little planning and the right approach, your brick wall can be beautifully lit, safe, and weather-ready. Now go light it up!