Transforming your backyard into a culinary oasis is no small feat, but for Alex, the allure of hosting gatherings and creating a personal retreat outweighed the challenges. This story chronicles Alex’s journey in designing and building a DIY outdoor kitchen from scratch—a blend of meticulous planning, resourceful execution, and creative flair.
Whether you’re a seasoned DIYer or a curious beginner, Alex’s experience offers a roadmap to crafting your own outdoor haven.
Dream Big: Planning and Inspiration
Exploring Types of Outdoor Kitchens
Alex began the project by researching three popular approaches:
- Custom Builds: Fully DIY, offering complete design freedom but requiring time and skill.
- Ready-to-Finish (RTF): Pre-framed structures customizable with your choice of finishes.
- Ready-to-Assemble (RTA): Modular kits for quick, straightforward assembly.
Envisioning a blend of practicality and personal touch, Alex opted for a hybrid design: combining custom-built elements with RTA cabinets to streamline the process.
Setting Goals
With a modest $10,000 budget, Alex prioritized:
- Must-haves: Grill, sink, fridge, and storage.
- Nice-to-haves: A pizza oven, smoker, and decorative lighting.
For layout, Alex chose an L-shape, balancing functionality with a cozy dining area.
Clearing the Canvas: Preparation and Demolition
Starting Fresh
The project began with clearing a neglected backyard corner, demolishing outdated fixtures, and leveling uneven ground. This foundational work was crucial for a clean and functional space.
Utility Upgrades
Recognizing the importance of professional-grade utilities, Alex outsourced critical work:
- Plumbing: Installed for the sink and future water features.
- Gas Lines: Safely connected to the grill.
- Electrical Wiring: Weatherproof outlets added for appliances and lighting.
Building the Foundations
Laying the Patio
A sturdy foundation was essential. Alex chose interlocking pavers, creating a level surface with proper drainage by layering gravel and sand beneath.
Adding Shelter: The Pavilion
To protect the space from sun and rain, Alex constructed a wooden pavilion. Stained in warm tones and adorned with string lights, the pavilion became a defining feature, blending utility with ambiance.
Bringing the Vision to Life
Framing the Kitchen
Using metal studs, Alex built a robust frame to support countertops and appliances. Concrete blocks formed the base, adding durability and fire resistance.
Crafting Concrete Countertops
After watching countless tutorials, Alex poured custom concrete countertops. This process involved creating molds, smoothing the surface, and sealing it for weather resistance.
Installing RTA Cabinets and Appliances
Assembling RTA cabinets was a breeze, saving hours of work. Alex installed a stainless steel grill, refrigerator, and sink, ensuring a seamless blend of aesthetics and utility.
Creative Cost-Saving Hacks
DIY Labor = Big Savings
By handling demolition, framing, and finishing themselves, Alex saved over $5,000 compared to professional services. These savings allowed for high-quality appliances and custom touches.
Repurposed Materials
Alex scoured local marketplaces for reclaimed wood, using it to craft a dining table and benches. Leftover concrete became stools, tying the look together.
Eco-Friendly Additions
A rainwater collection system supplied water for the sink, combining sustainability with practicality.
The Finished Project: A Backyard Transformation
Features:
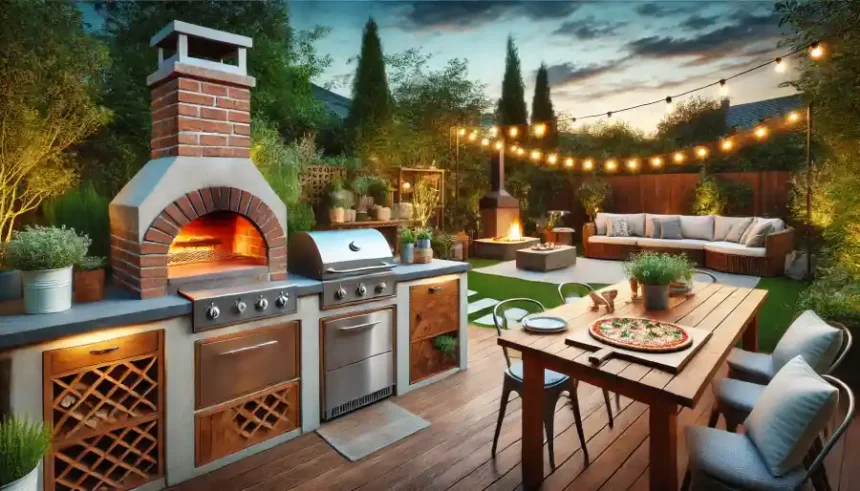
- Stylish Pavilion: Featuring string lights and fans for year-round comfort.
- Custom Countertops: Polished concrete for durability and a modern aesthetic.
- Built-In Appliances: A stainless steel grill, compact fridge, and functional sink.
- Dining Area: A rustic table and benches for hosting memorable meals.
Reflecting on Success: One Year Later
A year after completing the project, Alex marveled at the kitchen’s enduring charm. With minimal maintenance—cleaning appliances and resealing countertops—it remained the heart of every backyard gathering.
Lessons Learned:
- DIY is Rewarding: The process fostered creativity and pride.
- Plan for Growth: Inspired by the success, Alex planned to add a pizza oven and vertical herb garden.
Conclusion: Your DIY Journey Awaits
Alex’s experience proves that building a DIY outdoor kitchen isn’t just about creating a functional space—it’s about crafting memories, embracing creativity, and transforming your backyard into a personal sanctuary. With thoughtful planning and resourceful execution, anyone can achieve similar success.
So grab a sketchpad, dream big, and start your own DIY adventure. Like Alex, you’ll discover that the rewards extend far beyond the finished project.
Frequently Asked Questions About DIY Outdoor Kitchen
What is the best layout for an outdoor kitchen?
Functional Zones: Break the kitchen into zones:
- Prep Zone: Counter space for food preparation.
- Cooking Zone: Grill, stove, or oven placement.
- Cleaning Zone: Sink and trash area.
- Serving Zone: Counters for plating food or serving drinks.
Work Triangle: The layout should minimize movement between the grill, sink, and refrigerator (the key elements of a kitchen). Ensure these are placed within easy reach of each other.
Flow: Design with guest flow in mind—separate cooking areas from seating to avoid congestion.
What materials are best for outdoor kitchen construction?
- Countertops: Use durable, weather-resistant materials such as granite, concrete, or stainless steel. These can withstand heat, rain, and sunlight without warping or degrading.
- Cabinetry: Choose stainless steel or marine-grade polymer for cabinets. Avoid wood unless it is specially treated, as it can warp or rot in humid conditions.
- Flooring: Install slip-resistant and easy-to-clean surfaces like textured stone or concrete pavers.
- Finishes: Opt for UV-resistant paints or sealants to protect the kitchen from fading due to sunlight.
How do I ensure safety in my outdoor kitchen?
- Ventilation: If you’re using a grill or pizza oven, ensure there’s proper airflow to prevent smoke accumulation. For covered kitchens, include a ventilation hood.
- Distance from Home: Position the kitchen at least 10 feet away from the house or other flammable structures.
- Utilities: Work with professionals for plumbing, gas, and electrical installations to avoid hazards. Ensure all connections meet local building codes.
- Fireproof Materials: Use non-combustible materials (e.g., brick, stone) around cooking appliances.
What type of appliances are suitable for an outdoor kitchen?
- Grills: Gas, charcoal, or hybrid grills are staples. Choose a grill with sufficient cooking space for your needs.
- Refrigeration: Install an outdoor-rated refrigerator for drinks, sauces, and perishables. These are designed to handle temperature fluctuations.
- Sink: A sink with a cold water supply is practical for cleaning utensils and prepping food.
- Optional Add-ons:
- Pizza oven for gourmet cooking.
- Ice maker or wine cooler for entertaining.
- Smokers for specialized cooking.
What steps are involved in framing and finishing an outdoor kitchen?
- Foundation: Begin with a solid foundation, such as a concrete slab or pavers, to support the weight of the kitchen structure.
- Framing: Use materials like metal studs or concrete blocks for a durable and weather-resistant frame. Ensure the frame is level and securely anchored.
- Utilities Installation: Install plumbing, gas, and electrical lines during this stage, as they’ll be hidden behind finishes later.
- Finishing Touches:
- Apply stone, tile, or stucco to the frame for a polished look.
- Add countertops, and secure appliances in place.
- Install accessories like a backsplash or under-counter lighting for added style.
How can I protect my outdoor kitchen from weather?
- Shade and Shelter: Add pergolas, umbrellas, or retractable awnings to shield the area from direct sun or light rain.
- Waterproof Covers: Use protective covers for appliances when not in use, especially during harsh weather.
- Sealing: Apply waterproof sealants to countertops and cabinetry to prevent water damage.
- Winterization: In colder climates, shut off water lines and drain pipes to avoid freezing damage. Consider moving portable appliances indoors during off-seasons.

