Ever discovered a science-experiment casserole hiding at the back of your fridge and vowed, “Never again”? You’re not alone. In the U.S., an estimated 30–40% of food goes uneaten—roughly 20 pounds per person each month. That’s not only frustrating, it’s expensive, amounting to about $165 billion in wasted food every year. According to the FDA’s guide on cutting food waste and maintaining food safety, much of this loss is preventable. The good news: smart habits with your Food Storage Refrigerator can dramatically reduce spoilage and waste. This friendly guide covers everything from how to store food in your refrigerator to organizing strategies, temperature zones, and spoilage prevention. Along the way, we’ll share practical tips (and even a few quirky anecdotes) to keep your food safe, tasty, and budget-friendly.
We’ll also link to deeper resources: check out our Refrigerator Maintenance guide for upkeep tips, and our Refrigerator Buying Guide if you’re in the market for a new model. For now, let’s tackle the fridge you have!
Food Storage Refrigerator: Storing Food Safely and Freshly
Proper refrigeration is the foundation of food safety. In fact, the FDA notes that proper home food storage helps maintain safety and food quality by keeping flavor, color, texture and nutrients in your food. Here are the essentials:
Keep it cold
Refrigerators should be kept at or below 40°F (4°C) to prevent bacterial growth and keep food safe. The FDA recommends setting your fridge between 32°F and 40°F and using a refrigerator thermometer to ensure accurate temperature—especially important after a power outage or when evaluating a new appliance. For more detailed guidance, check out this food storage resource from the University of Nebraska–Lincoln.
Follow the 2-hour rule
Perishable leftovers should hit the fridge within 2 hours of cooking (or 1 hour if it’s sweltering outside). Leaving food out invites bacteria to multiply. Once in the fridge, date-label your containers so you know what to use first.
Seal and cover everything
Store foods in airtight containers or sealed bags to lock in freshness and prevent odors or cross-contamination. For example, wrap meats securely and place them on a plate (or in a lidded container) on the lowest shelf to catch drips. Leftovers and cut produce last longer in covered glass or BPA-free plastic containers.
Separate raw and cooked
Keep raw meats on the bottom shelf (in their original packaging or a sealed tray) so any juices don’t drip onto other foods. The middle shelves are perfect for deli meats, prepared foods and dairy, while ready-to-eat items like drinks and condiments can go on the top or door (more on zones below).
Cool before chilling
Let hot foods cool a bit on the counter (no more than 1–2 hours), then refrigerate. Crowding a very hot dish in the fridge can raise the overall temperature. (Bonus tip: Never cover hot food tightly; let steam escape, or it can water-log the dish.)
Following basic food storage guidelines helps prevent spoilage and foodborne illness. For specific shelf-life information, tools like the USDA’s FoodKeeper app—recommended by the FDA—offer safe storage times for hundreds of foods and beverages. As a quick reference, many leftover meats, soups, and casseroles stay safe for 3–4 days in the refrigerator, while raw eggs in their shells can last 3–5 weeks. (For best results, store eggs on a middle shelf in their original carton—not in the door—so they stay consistently cool.) For more detailed guidance, check the cold food storage charts at FoodSafety.gov. And remember: when in doubt, throw it out.
Organizing Your Fridge: Layout and Best Practices
A tidy fridge is a functional fridge. Organizing your refrigerator not only saves space but also helps you see what you have before something goes bad. Follow these steps:
Empty and clean first
Pull everything out, toss expired items, and scrub shelves. (A clean fridge with a box of baking soda in back smells better, by the way.) Checking expiration dates as you put things back is a great way to start fresh.
Create zones
Grouping similar items together makes it easier to find what you need and keeps your fridge tidy. Try designating specific zones—one for dairy like milk, cheese, and yogurt; another for leftovers and prepped meals; and a separate spot for drinks. Smaller condiments stay visible and accessible when stored in a corner bin or on a door shelf. A professional organizer featured on The Spruce recommends arranging shelves based on item height—tall bottles on one shelf, shorter jars and containers on another—to maximize space and visibility.
Use bins and labels
Clear plastic bins (for fruits, veggies, snacks) and labeled containers can be a game-changer. They keep things contained and visible. Label leftovers with what and when – a handy practice to rotate older items to the front. Consider a mini whiteboard or chalkboard on the door to note what’s inside each bin (or a “Use Soon” shelf).
Don’t overpack
Air circulation is key. Overstuffing the fridge forces the compressor to work harder and can create warm pockets. (In fact, FDA advises avoiding an “overpacking” the fridge for exactly this reason.) Leave some breathing room between items.
Maximize every inch
Use shelf risers or under-shelf baskets for extra space. Keep a lazy Susan for sauces and condiments – no more digging in back! Stackable cheese trays or vertical bottle organizers make the most of shelf height. If space allows, stash lesser-used items (like extra butter) in the door or on the very top shelf.
While organizing, think of what you use most and make those items easiest to grab. Keep a plate or two on the top shelf so you always have a quick spot for leftovers. The more logical your layout, the less likely things will be forgotten and forgotten.
Container Comparison: (Feel free to create your own mini-table in your mind – or set up a chart in your kitchen!)
| Storage Type | Pros | Cons |
| Glass containers | Durable, non-absorbing (no odors), can go from fridge to oven/microwave | Heavier, can break if dropped |
| Plastic containers | Lightweight, affordable, many stackable designs | Can stain (tomatoes, curry), may absorb odors; not all are microwave-safe |
| Reusable silicone bags | Flexible, space-saving, eco-friendly (no flimsy disposables) | Can be pricier, need handwashing if no dishwasher-safe |
| Zip-top freezer bags | Very space-efficient, good for liquids or odd-shaped items | Single-use mostly, easier to tear, no rigid structure |
Use whichever suits your kitchen vibe, but the key is airtight, clear, and well-labeled.
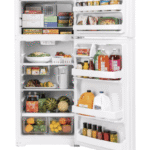
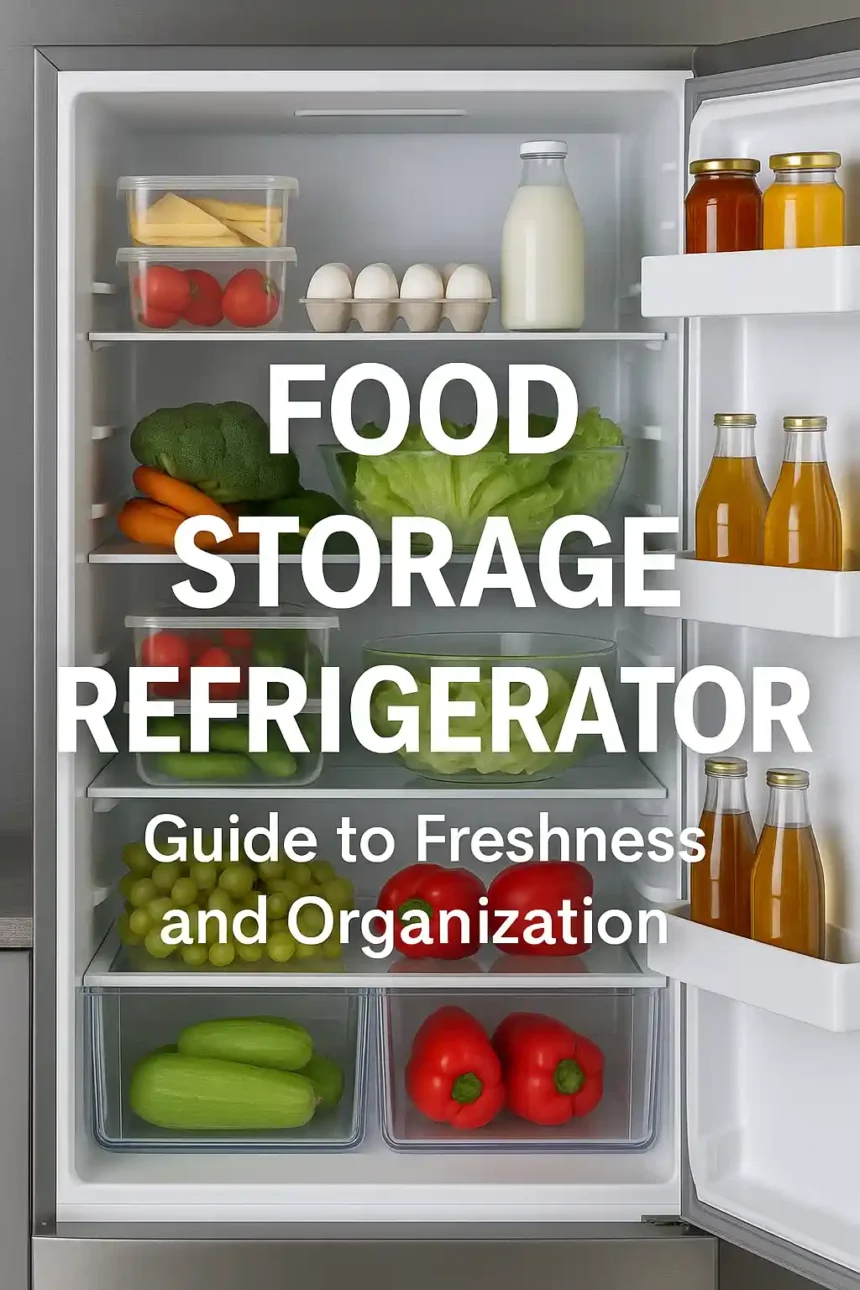
Food Placement and Temperature Zones in Your Fridge
Did you know not all fridge spots are created equal? Different areas run slightly warmer or colder. Here’s a basic fridge temperature map:
Top Shelves (Cold, stable)
This is for ready-to-eat foods and drinks – yogurt, leftovers, eggs, deli meats, juices. (Many eggs and dairy cartons have instructions to refrigerate immediately, and storing them on a flat top shelf in the cold zone helps them last.)
Middle Shelves (Medium-Cold)
Keep leftover meals, sandwiches, cheese, lunch meats. These are all fully cooked or factory-sealed, so being a tad warmer than the back isn’t a big deal.
Bottom Shelf (Coldest)
This is the coldest section – perfect for raw meat, poultry, fish, and anything that needs a strict chill. Always keep raw proteins on the very bottom so any drips don’t contaminate foods below. Vacuum-sealed or airtight-wrapped cuts go here.
Crisper Drawers
Most fridges have two drawers with adjustable humidity. The high-humidity drawer (often marked with a closed lettuce icon) is ideal for leafy greens and veggies (lettuce, broccoli, carrots) that tend to wilt – the extra moisture keeps them crisp. The low-humidity drawer (open lettuce icon) is better for fruits (apples, grapes) and veggies that emit moisture (bell peppers, mushrooms) since they fare better with some air flow.
Door Shelves (Warmest)
The fridge door is slightly warmer due to opening/closing. Store condiments, jams, juices, and other robust items here. Avoid the door for milk, eggs, or meat, since frequent temperature swings shorten their life.

Because the door is the warmest, try not to stash perishables on the door for too long. And keep raw eggs in their main cartons inside, not the butter tray (so they stay steady at 35–38°F, as recommended). Remember: cold air sinks, so vents near the bottom push chilled air upward; don’t block those vents with tall bottles.
Preventing Food Spoilage: Preservation Tips
Even with an ideal fridge, food will eventually spoil if not managed. But you can slow the spoilage clock:
- Check temps and spills. We’ve covered 40°F max, but don’t forget the details. Keep that thermometer handy, and if anything spills, wipe it up immediately. Spill cleanup not only keeps smells away but also knocks out bacteria like Listeria (which can grow at refrigerator temps).
- Cover cut produce. If you’ve chopped fruits or veggies, refrigerate them promptly in airtight containers. FDA advice: “Refrigerate peeled or cut veggies for freshness and to keep them from going bad.”. A salad spinner bag or perforated container can keep leaves crisp too.
- Use freezer when appropriate. The freezer is your ultimate backup. Nearly anything can be frozen: leftover bread, cooked soups, extra herbs, even cheese (grate it first). The FDA notes freezing “is a great way to store most foods to keep them from going bad”. Consult FoodKeeper or label your own stash with dates.
- Mind produce shelf life. Some items inherently last longer. Onions, potatoes and garlic shouldn’t go in the fridge at all; they keep better in a cool pantry. Berries and mushrooms are best used in a few days, so plan those quickly. Herbs can be wrapped in a damp paper towel. And remember, ripening (ethylene) vegetables like apples, bananas or tomatoes often do better outside or in a low-humidity drawer.
- Understand what “Best By” dates really mean—they’re not safety deadlines. According to the FDA, these labels (such as Best By, Sell By, and Use By) are set by manufacturers to indicate peak quality, not food safety. In fact, confusion over these dates accounts for up to 20% of food waste in the home. If a product looks, smells, and tastes normal, it’s often still safe to eat beyond the printed date. Use your judgment, and when in doubt, remove any moldy parts—or toss the item entirely.
- Regularly inventory. Once a week, peek in and note what’s aging. You might put a quick reminder on your phone (“Use chicken by Thursday!”) or have a stash box for “eat first” foods. This won’t eliminate spoilage completely, but it dramatically reduces surprises.
With these habits, mold and mystery fades become rare. Spoilage is a fact of life, but a clean, correctly chilled fridge can extend life by days or weeks.
Reduce Food Waste in Your Refrigerator: Smart Strategies
Less waste means more savings and less guilt. Here are refrigerator-specific ways to cut down on chucking food:
Plan and portion
Before grocery shopping, take stock of your fridge (even make a list). Only buy what you need. FDA suggests writing a meal plan and sticking to a list. If dinner yields leftovers, portion them immediately into meal-sized containers so they actually get eaten later.
First in, first out
When restocking, move newly-bought items to the back and bring older ones forward. That way the veggies you bought last week don’t languish unseen. Label leftovers with dates, and use the oldest ones first.
Designate an “Eat Me Soon” shelf
As one FDA tip puts it, keep a special spot for foods that will go bad within a few days. Whether it’s the top-left or a marked bin, this visual cue helps you remember those items before they turn.
Freeze surplus and ugly produce
If you bought or harvested more than you can eat, or have those “ugly” apples and bruised tomatoes, use them in smoothies, soups, or freezer bags. The FDA encourages using excess produce or donating canned goods. Frozen fruit still holds most of its nutrients and can make great smoothies later.
Check often, eat soon
Develop a habit: every couple of days, do a quick fridge check. Use or freeze anything that’s on the edge. The FDA recommends scanning your fridge inventory regularly to decide what needs eating or freezing “before you need to throw it away”.
Love your leftovers
Sometimes leftovers just need a menu rebranding. Turn stale rice into fried rice, wilted lettuce into a stir-fry, or excess veggies into a hearty soup. Keep our fridge organized so those extras don’t languish forgotten in a corner.
By combining these strategies, you’ll see your trash bin fill more slowly. Every bit you save adds up – and it feels great to make the most of your groceries.
Conclusion
The bottom line: Organize, store smart, and monitor often. Keeping your fridge at the right temperature, grouping items logically, and using up what you have will keep foods safe and reduce waste. Remember to wrap and label foods, follow the two-hour rule, and consult reliable charts (or apps like FoodKeeper) for how long things last in the fridge.
Get creative and personable with your system – maybe with a weekly fridge audit reminder or a fun magnetic list on the door. As you build these habits, you’ll notice less spoiled food and more savings. And hey, you might even enjoy flexing your new organization skills: “Hey family, dinner’s in bin #3 tonight!”For further reading, check out our related guides on all things refrigeration: Refrigerator Maintenance, Buying Guide, Features, and Types of Refrigerators. Here’s to a fresher, more efficient fridge and a greener kitchen practice!